Simple SAML
WARNING: This plugin should only be enabled and configured by system administrators as it affects how users log in to ResourceSpace.
This plugin allows users to log on to ResourceSpace using a SAML compliant single sign-on (SSO) Identity Provider (IdP)
Important information
- Please note that use of this plugin is dependent on your organisation having implemented a SAML 2.0 compliant single sign-on solution (IdP). Configuration of this plugin will require co-operation between your ResourceSpace hosting provider and the administrators of your Single Sign-On system.
- Implementing a new single sign-on solution is not trivial and is normally an organisation wide decision requiring a significant amount of work. If you are at all unsure as to whether you have a single sign-on solution in place please speak to your IT team.
Examples of compliant SSO solutions are:
- OpenAM
- Microsoft Entra ID (formerly Azure AD)
- Google Workspace
- Okta
- OneLogin
- Oracle Access Manager
- Shibboleth
- Keycloak
Preliminary Configuration
This plugin utilises the simplesamlphp application (https://simplesamlphp.org/). Please refer to the documentation for this project if you require more advanced configuration instructions.
Please select the relevant instructions for the version of ResourceSpace you are running
- Setting up the SAML SP
- Configuring the plugin options
- Migrating a legacy file based SP to use standard ResourceSpace configuration
- Upgrading to ResourceSpace version 10.6 (simplesamlphp version 2.3.5)
- Troubleshooting
Setting up the SAML SP
Setting up SAML requires your Identity provider to know about ResourceSpace, and for ResourceSpace to trust your SAML Identity provider. This is achieved through exchanging metadata, normally in XML form.
The ResourceSpace side of this can be configured solely using the UI, or via the ResourceSpace configuration file for more complicated setups.
Step 1 - Enable the plugin
- Navigate to Admin - System - Plugins
- Enable the SAML plugin under the 'Authentication' section by clicking on 'Install'
- Click on 'Options' for the plugin
Step 2 - Configure the SP
Option 1 - Adding IdP metadata from a URL (available from version 10.7)
This method can be used when your IdP metadata is available at a publicly accessible URL. With this setup the IdP metadata is regularly updated via ResourceSpace's scheduled tasks, meaning that the potential loss of access due to expired IdP certificates is avoided
- Under 'Select the IdP configuration source', select 'Metadata URL (XML)'
- Enter the URL of your IdP metadata
- Click 'Update now' and verify that the last updated date is set and that no errors are reported
Option 2 - Adding IdP metadata manually
This method needs to be used when using ResourceSpace before version 11, or when the IdP metadata is not available at a public URL (e.g. Google Workspace)
For this method you need to generate the configuration code and add it to the ResourceSpace configuration file (include/config.php)
To generate the required text:
- Under 'Select the IdP configuration source', select 'ResourceSpace configuration file (config.php)'
- Click on the 'Generate SP config' link
- Set technical contact details and an admin password for the SP test site (see 'Testing the SP' below)
- If you are using a previously generated certificate and key, enter the paths to the certificate and key files in PEM format. These fields can be left blank to automatically generate new certificates based on additional certificate questions that will appear. Ensure that the filestore folder is not browseable in your web server configuration
- If you have your IdP metadata in XML format you can paste it in here. If you already have the IdP metadata in your configuration then you can just paste in the relevant IdP entity ID
For advanced users
The standard SimpleSAMLphp definitions map to ResourceSpace configuration as below
- The $config variable (from lib/config/config.php becomes $simplesamlconfig["config"]
- The $config variable (from lib/config/authsources.php becomes $simplesamlconfig["authsources"]
- The $metadata variable (from e.g. lib/metadata/saml20-idp-remote.php becomes $simplesamlconfig["metadata"]
Testing the SP
Once the SAML SP configuration has been added to the ResourceSpace config file you can test the connection to the IdP by clicking on the 'Visit SimpleSAMLphp test site' link from the plugin setup page.
You will need to log in with the admin password you set for the SP. From version 11 this can be reset by entering a new password in the 'Reset SimpleSAML test site admin password' field on the plugin setup page
- Click on 'Test configure authentication sources' and select 'resourcespace-sp'
- If configured correctly you will be directed to the IdP login page
- Sign in to your IDP. You will see a page listing all the attributes provided by your IDP
- You can use these attribute names to populate the username, fullname and email mappings in the main plugin setup page
Configuring plugin options
The plugin options page requires the following information to be provided:-
| Use standard ResourceSpace configuration files to set SP configuration and metadata | If this set to false then manual editing of files is required. If set to true, make sure when configuring $simplesamlconfig['authsources'] that you name it resourcespace-sp |
| Allow SP metadata requests for "www" route? (changing to false will require IdP to re-exchange the SP metadata) |
(new for v10.6) Always set to false if this is the first time configuring the plugin. Otherwise, leave it set to true and aim to co-ordinate with your IdP admins because changing it will mean the SP entityID will change its sub-path from "www" to "public" so you'll have to make the switch as soon as the IdP have made their change. |
| SAML Lib path | Please enter the full server path to the SimpleSAML lib folder (only required if using the legacy config). Note that from version 10.5 this must be set in the system configuration file as $simplesaml_lib_path |
| Use SAML to block access to site completely, if set to true then no one can access site, even anonymously, without authenticating | If set to TRUE, this means that no user can access the site without signing in to the IdP |
| Use SAML credentials to login to ResourceSpace? (This is only relevant if above option is enabled) | If above is TRUE and this is FALSE you can then configure anonymous access which will be only available to your SSO users |
| If blocking site, allow public shares to bypass SAML authentication? | Allow external shares to bypass the requirement for SAML SSO access |
| Name of local service provider (SP) | As configured in step (3) |
| List of additional allowed paths that can bypass SAML requirement | Pages listed here will not require SAML login |
| Allow users to log in with standard accounts as well as using SAML SSO? | If set to FALSE users will not be able to log in with standard ResourceSpace accounts |
| Prefer standard login (redirect to login page by default) | If set to TRUE users will be taken to login page which has a 'Sign on using SSO' link. If FALSE then users will be signed in automatically or redirected to the IDP. If above option is enabled and users want to log in using standard accounts they will need to navigate directly to login.php |
| Update user group at each logon. If not using SSO group attribute to determine access then set this to false so that users can be manually moved between groups | Self explanatory |
Duplicate account management |
|
| Email-match: Before creating new users, check if the SAML user email matches an existing RS account email. If a match is found the SAML user will 'adopt' that account | This helps when implementing SSO for an existing installation provided the email addresses match the SSO account |
| Allow new accounts to be created if there are existing ResourceSpace accounts with the same email address? (this is overridden if email-match is set above and one match is found) | If this is false and a SAML account has the same email address and is not 'adopted' as above then no new account will be created and the login will be blocked |
| Email address to notify if an email conflict is found | If the above is set to false then an email will be sent to this address when the matching SAML user tries to log in. The email address used must belong to a valid ResourceSpace user account. |
IdP configuration |
|
| Attribute(s) to use for username. If this is a concatenation of two attributes please separate with a comma | Which SAML attribute will be used for the username. Two attributes can be combined e.g. initials and surname |
| If joining fields for username use this character as a separator | This will be used as the separator if multiple attributes are used for the username |
| Attribute(s) to use for full name. If this is a concatenation of two attributes please separate with a comma | Which SAML attribute will be used for the full name. Two attributes can be combined e.g. first name and surname |
| If joining fields for full name use this character as a separator | This will be used as the separator if multiple attributes are used for the full name |
| Attribute to use for email address | This will be stored in the ResourceSpace email field and used for system emails |
| Attribute to use to determine group membership | This will be used if SAML - ResourceSpace Group Mappings are configured |
| Default user group that will be used for newly created users | New SAML users will be added to this group if no match is found with a configured group mapping |
| Custom attributes to record against the user record | Any attributes listed here will be stored against the ResourceSpace user record and can be seen on the user edit page |
Authorisation rule |
|
| Attribute (assertion/ claim) name | The attribute received from IdP and on which ResourceSpace will decide if user is allowed to log in or not. |
| Attribute (assertion/ claim) value | The value of the authorisation attribute on which ResourceSpace will decide if user is allowed to log in or not. |
| SAML-ResourceSpace Group Mapping | Each SAML group can be manually mapped to a RS group and assigned a priority. If the groups are known these can be input in advance. Each group mapping can be assigned a priority to deal with the usual situation that a user is a member of multiple groups. For example if it is required that membership of a media team group take precedence over the general staff group mapping, the media team mapping should be assigned a higher number. |
Migrating an existing file based setup SP to use ResourceSpace configuration
The most complicated part of this is to ensure that the IdP continues to communicate with the SP correctly. The switch to using ResourceSpace configuration means that the URL of the SAML SP changes, so to keep things working you will need to either:
- Add web server configuration to create an alias or redirect to the new URL
- Update the IdP with the new URL.
Other then the web server changes all that is really being done here is taking the settings from the SimpleSAMLphp configuration and storing them as ResourceSpace variables
You will first need to identify the location of your SimpleSAML 'lib' folder. By default this will be located in the ResourceSpace web folder (plugins/simplesaml/lib). You can check whether your lib folder is located outside of the plugins directory by checking the path defined on the simplesaml plugin setup page.
Migrating the metadata
- On the plugin options page, ensure that 'Use standard ResourceSpace configuration files...' is set to TRUE. Before you do this, make sure to remove the current lib path and SP name.
- Copy the config.php settings
- Open /config/config.php and copy the whole '$config' array definition
- Add this to your ResourceSpace configuration file as $simplesamlconfig["config"] e.g.
$config = [ /******************************* | BASIC CONFIGURATION OPTIONS | *******************************/ /* * Setup the following parameters to match your installation. * See the user manual for more details. */ /* * baseurlpath is a *URL path* (not a filesystem path). * A valid format for 'baseurlpath' is: * [(http|https)://(hostname|fqdn)[:port]]/[path/to/simplesaml/] * * The full url format is useful if your SimpleSAMLphp setup is hosted behind * a reverse proxy. In that case you can specify the external url here. * * Please note that SimpleSAMLphp will then redirect all queries to the * external url, no matter where you come from (direct access or via the * reverse proxy). */ 'baseurlpath' => '/filestore/system/saml/www/', /* ...- becomes
$simplesamlconfig["config"] = [ /******************************* | BASIC CONFIGURATION OPTIONS | *******************************/ /* * Setup the following parameters to match your installation. * See the user manual for more details. */ /* * baseurlpath is a *URL path* (not a filesystem path). * A valid format for 'baseurlpath' is: * [(http|https)://(hostname|fqdn)[:port]]/[path/to/simplesaml/] * * The full url format is useful if your SimpleSAMLphp setup is hosted behind * a reverse proxy. In that case you can specify the external url here. * * Please note that SimpleSAMLphp will then redirect all queries to the * external url, no matter where you come from (direct access or via the * reverse proxy). */ 'baseurlpath' => '/filestore/system/saml/www/', /* ...- Replace any setting for 'logging.level' with the integer equivalent as defined in plugins/simplesaml/lib/lib/SimpleSAML/Logger.php
- Ensure that the 'baseurlpath' setting remains as it was before if you cannot alter the IdP settings
Note that you can safely remove any default settings, but it is advisable to do this later after you have verified that the new ResourceSpace configuration works as expected
- Copy the authsources.php settings
- Open /config/authsources.php and copy the whole '$config' array definition
- Add this to your ResourceSpace configuration file as $simplesamlconfig["authsources"] e.g.
$config = [ // This is a authentication source which handles admin authentication. 'admin' => [ // The default is to use core:AdminPassword, but it can be replaced with // any authentication source. 'core:AdminPassword', ], // An authentication source which can authenticate against both SAML 2.0 // and Shibboleth 1.3 IdPs. 'resourcespace-sp' => array( 'saml:SP', ...- becomes
$simplesamlconfig["authsources"] = [

// This is a authentication source which handles admin authentication.
'admin' => [
    // The default is to use core:AdminPassword, but it can be replaced with
    // any authentication source.

    'core:AdminPassword',
],

// An authentication source which can authenticate against both SAML 2.0
// and Shibboleth 1.3 IdPs.
'resourcespace-sp' => array(
    'saml:SP',
...
Please note that the authsource used live will always be named resourcespace-sp
- Copy the metadata settings
- Copy any '$metadata' elements from the files under /metadata
- Add these to your ResourceSpace configuration file as $simplesamlconfig["metadata"] elements.
e.g.
$metadata['https://accounts.google.com/o/saml2?idpid=C579sf7c83'] = array ( 'entityid' => 'https://accounts.google.com/o/saml2?idpid=C579sf7c83', 'contacts' => array ( ), 'metadata-set' => 'saml20-idp-remote', 'expire' => 1660397726, ...becomes$simplesamlconfig["metadata"]['https://accounts.google.com/o/saml2?idpid=C579sf7c83'] = array ( 'entityid' => 'https://accounts.google.com/o/saml2?idpid=C579sf7c83', 'contacts' => array ( ), 'metadata-set' => 'saml20-idp-remote', 'expire' => 1660397726, ...
Adding a web server alias
Please note that these instructions are only provided as examples. Please check your web server documentation and organisational processes before making any changes since any misconfiguration is likely to result in loss of access to ResourceSpace
Adding a redirect in Apache
- Ensure mod_alias is enabled
a2enmod alias
- Add the following line in the VirtualHost config
# For SAML support after moving lib to RS config
Alias [relative path to current SAML lib/www/folder] /plugins/simplesaml/lib
e.g.# For SAML support after moving lib to RS config Alias /filestore/system/saml /plugins/simplesaml/lib
- Reload apache configuration
systemctl reload apache2
Adding a redirect in Windows/IIS
- Open the IIS administration console
- Expand the folders until you reach the existing SAML lib path e.g. navigate to filestore/folder
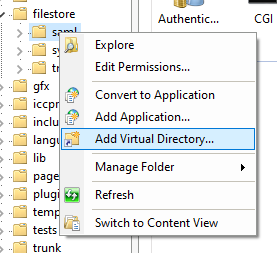
- Right click on the saml lib folder (one level above the SAML www folder) and click 'Add virtual directory'
- Enter www as the alias. For the physical path browse to the /plugins/simplesaml/lib/www folder
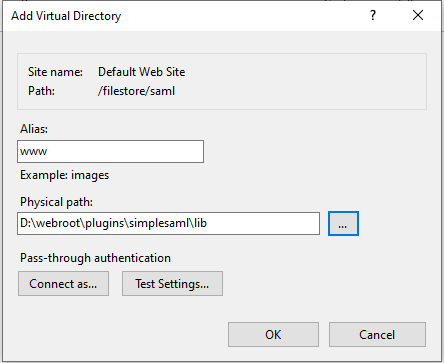
You should now be able to log in to the test site from the plugin options page to test the configuration.
Upgrading to ResourceSpace version 10.6 (simplesamlphp version 2.3.5)
File based configuration
File based configuration is still possible. For fresh setup, we recommend using the metadata URL orResourceSpace's own configuration file for this. If you do need to configure it using files, there's a few things to be aware of:
- The config must have the "cachedir" correctly configured (e.g /tmp/simplesamlphp).
- The authsource entityID must be set - for example: https://example.domain.tld/plugins/simplesaml/lib/public/module.php/saml/sp/metadata.php/resourcespace-sp (where resourcespace-sp is the same name as your authsource).
Migrating configuration files (if applicable)
Everyone has their own way of moving from one version of a configuration file to a newer one. An approach is to:
- While still on ResourceSpace v10.5, run a diff between ./plugins/simplesaml/lib/config-templates/config.php and your actual configuration ./plugins/simplesaml/lib/config/config.php to get a picture of the actual changes;
- Run a diff between ./plugins/simplesaml/lib/config-templates/config.php file (v10.5) and the new (v10.6) ./plugins/simplesaml/lib/config/config.php.dist file;
- Compare the results with your actual config changes and determine what changes you have to port over to upgrade to ResourceSpace v10.6.
- Your authsource entityID must be updated too, for example: https://example.domain.tld/plugins/simplesaml/lib/www/module.php/saml/sp/metadata.php/resourcespace-sp (where resourcespace-sp is the same name as your authsource).
For systems where simplesamlphp is configured through ResourceSpace own configuration file, there's no immediate action required. Admins are advised to:
- work with the IdP on changing SP metadata to use "public" routes (see 'Allow SP metadata requests for "www" route?' plugin setting);
- read the debug logs and correct the authsource settings for "NameIDPolicy" and "database.slaves", if applicable.
Web server alias
Simplesamlphp has moved the www to the public directory. This change means that the IdP configured with the older version will will make requests to a non-existent www route. Until you can update the IdP, you must create an alias for the old route.
Apache example:
Alias /plugins/simplesaml/lib/www /var/www/plugins/simplesaml/lib/publicTroubleshooting
[PROBLEM] when testing the SP, after logging in on the IdP side and being redirected back to ResourceSpace (simplesamlphp) you see an "UNHANDLEDEXCEPTION" error caused by "Requester/InvalidNameIDPolicy".
If the IdP metadata has specific NameID format requirements such as:
    'NameIDFormats' => array (
        0 => 'urn:oasis:names:tc:SAML:1.1:nameid-format:emailAddress',
        1 => 'urn:oasis:names:tc:SAML:2.0:nameid-format:persistent',
        2 => 'urn:oasis:names:tc:SAML:2.0:nameid-format:transient',
    ),
To fix this, add a NameIDPolicy to the $simplesamlconfig['authsources'] configuration. Example:
    $simplesamlconfig['authsources'] = [
        'admin' => ['core:AdminPassword'],
        'sp.name.example' => [
            'saml:SP',
            'privatekey' => 'path/to/sp_saml.pem',
            'certificate' => 'path/to/sp_saml.crt',
            'entityID' => null,
            'idp' => 'idp.example',
            'discoURL' => null,
            'NameIDPolicy' => 'urn:oasis:names:tc:SAML:1.1:nameid-format:emailAddress',
        ],
    ];
For Entra ID, using "urn:oasis:names:tc:SAML:1.1:nameid-format:unspecified" seems to work most of the times.
[PROBLEM] SimpleSAML plugin is not fully configured (missing authsource)
There can be a few reasons:
- the plugins' setting "Name of local service provider (SP)" is set to a value that's missing in the $simplesamlconfig['authsources'] configuration. To fix it:
- check your configured authsources and use the value (double check with what's configured on the IdP side too to avoid having to re-exchange the metadata);
- due to a relatively old logic bug, setting it to "resourcespace-sp" is safe as we used to override it at runtime so your IdP is likely using this SP.
- the plugin has been partially configured and is genuinely missing the authsource
[PROBLEM] SimpleSAML admin portal (test page) throws "SimpleSAML\Error\Exception: No private key found in metadata."
This is usually affecting only the admin test page and is likely because the IdP is configured to NOT encrypt the assertion. To fix it, add the following config:
$simplesamlconfig["config"]["assertion.encryption"] = false;