Video splice
The video splice plugin allows users to trim individual videos and to merge videos together within ResourceSpace to create new, separate files.
Trimming videos
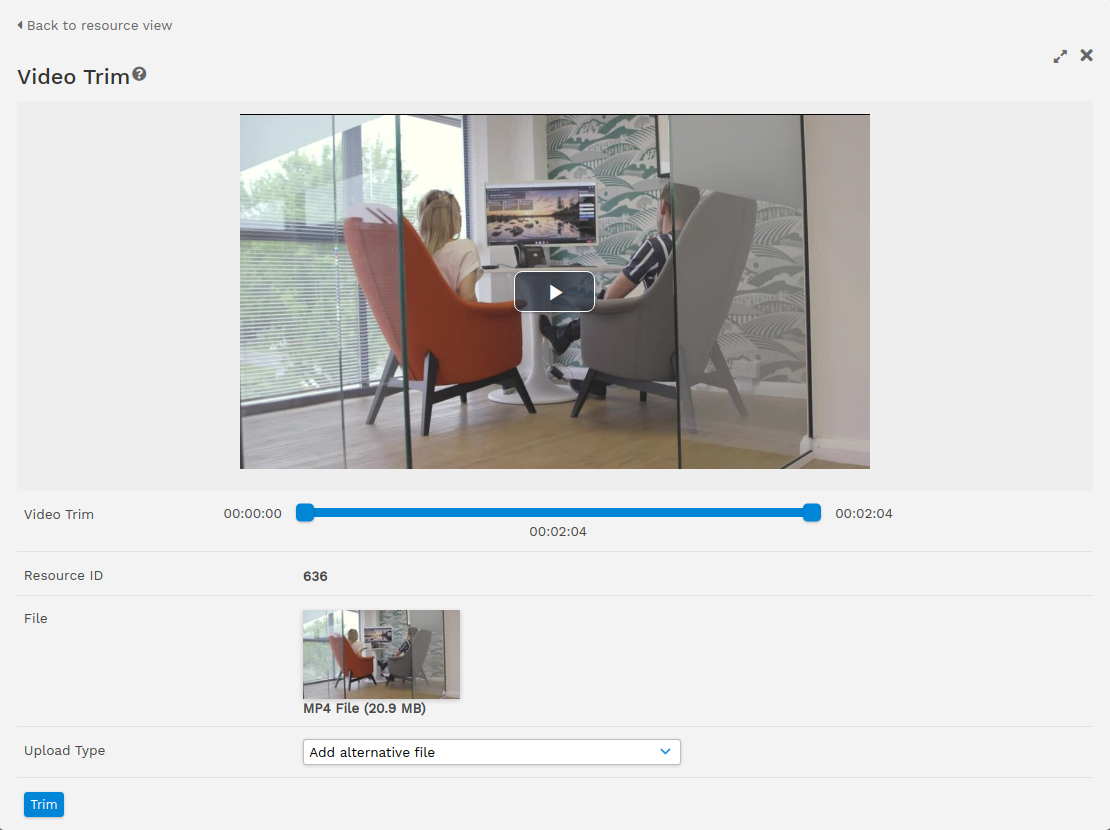
The trim tool allows you to easily select portions of a video to be recreated as a new video file. This file can then either be added as a new resource, or attached as an alternative to the original. To do this you will need to:
- Navigate to the view page of the resource you wish to trim.
- If the extension of the resource is within the allowed extensions option in the configuration setup a trim button will appear on the right with the other resource actions.
- Click the trim button link.
- From here you can use the handles below the video preview to trim the preview.
- Once happy, finalise the other options in the form and click trim.
- A notification will appear at the top of the page once complete, this may take some time.
Additional notes
The trim tool option will only appear for resources that have an original file of particular extensions. These extensions can be seen in the plugin configuration page and are by default limited to some common video extensions.
The output options available will vary based on user permissions:
Add alternative file - must be able to edit the resource and manage alternative files.
Create new resource - must be able to edit the resource and create new resources.
From version 10.4: Download - must have open access to the resource.
Things to be aware of:
The trim tool uses video previews to help you select the correct trim. If your preview length is configured to be shorter than the original file, it may be that the trim selected is outside of the system preview. If that is the case, you will be notified by a pop up informing you that you are outside the bounds of the preview.
Splicing videos
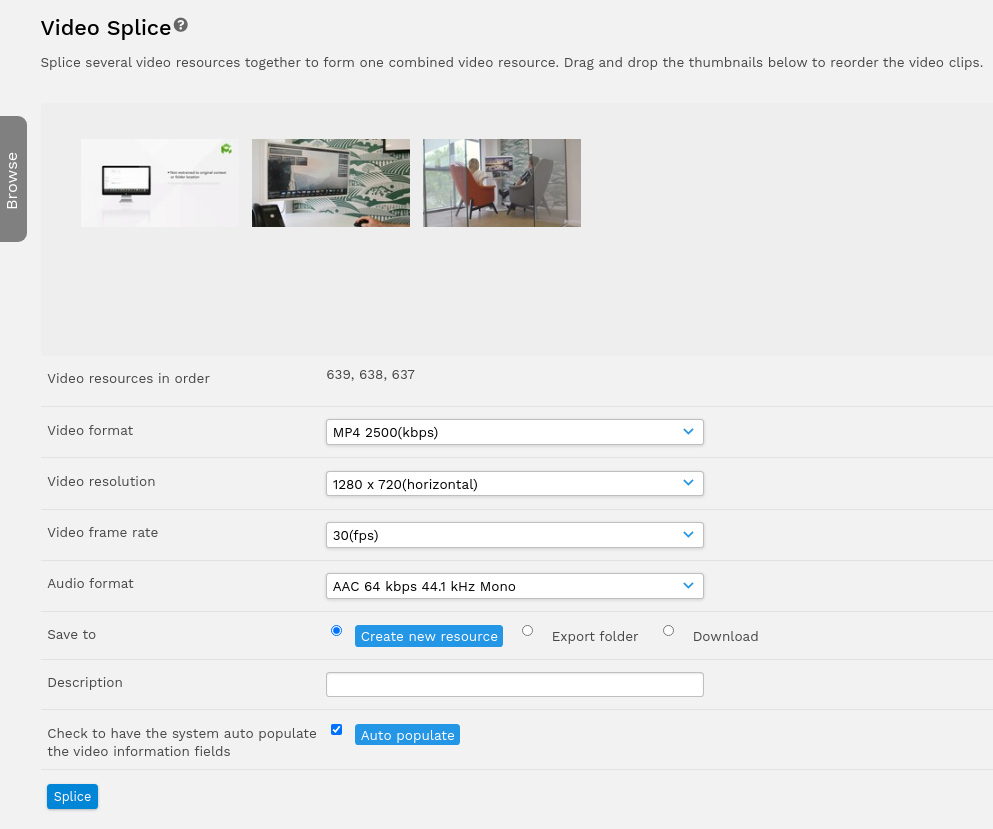
The splice tool allows you to merge several video resources together to create a new file. This file can then be made into a new resource, sent to the video export folder or downloaded. The splice function can be used in real time but also works alongside offline jobs, allowing you to continue your work elsewhere. To use splice you will need to:
- Build a collection with the videos in that you would like to combine
- Using the action drop-down in the collection bar at the bottom of the page select "Splice".
- This will bring you to the splice page, from here you can use the previews shown to drag and drop to reorder them as you wish.
- Select your output options below, this will select the encoding you would like to output.
- Pick your file creation type.
- Create new resource
- Export
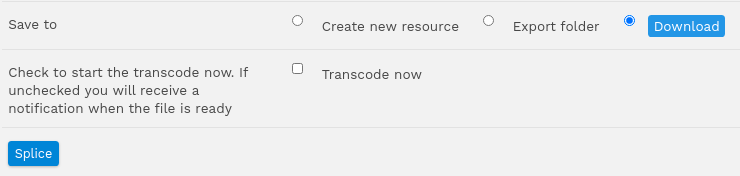
- Download
- Once happy, click Splice.
- A notification will appear at the top of the page once complete, this may take some time. If using offline jobs this will notify you of the jobs creation and you can then leave the page.
Additional notes
When reordering the videos on the splice page please be aware the new order will be reflected in the collection itself. By default there is a selection of output options available on the splice page for bitrates, resolutions and frame-rates. You can add to this via system configuration changes, more information found below. Additional options exist for the "Create new resource" and "Download"(if offline jobs enabled) options.
- Create new resource
- Description: you will be presented with the option to add a description, this will be added to the field selected via the plugin setup page.
- Auto Populate: you will have the option to auto populate video information, using the information from the chosen bitrate, resolution and frame-rate these can be placed automatically into the fields selected in the plugin setup page.
- Download
- Transcode Now: this will only show if offline jobs is enabled but allows you to bypass the offline jobs to get the new video generated and downloaded as soon as possible.
Things to be aware of:
The export functionality requires a configured file path to the export folder. By default no folder is set so this will to be defined before use. See configuration information below on how to set this.
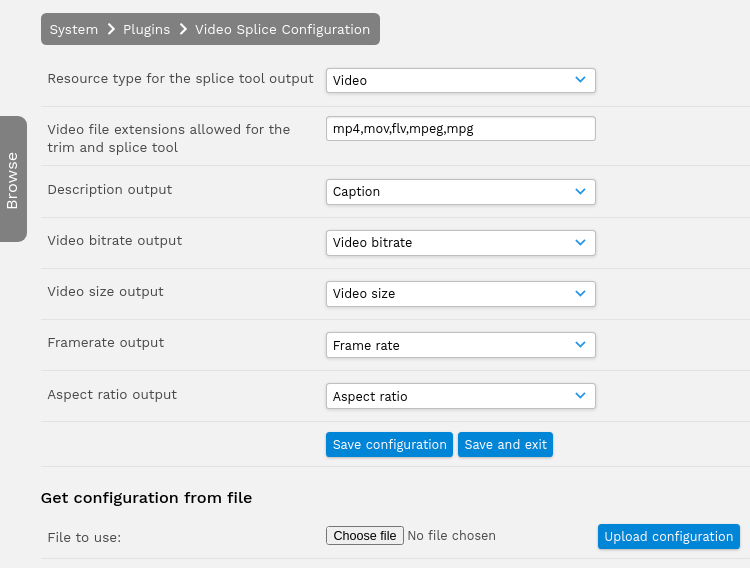
Configuration
- Resource type for the splice tool output: this is the resource type you would like the newly created resources of the splice tool to be.
- Video file extensions allowed for the trim and splice tool: this is the extensions you would like the trim and splice tools to work for. The trim option will only show for these types and the splice tool will only display and reorder resources with these extensions.
- The rest of the options below: these are the fields you would like to associate with the corresponding outputs, by default these are mapped to relevant fields.
- Video export file path: this is a system option relating to file paths and so defined in the ResourceSpace config.php file. This must be added by someone with the authority to do so.
- Video custom options: this is a system option. By default there is a range of output options available on the splice page for bitrates, resolutions and frame-rates, to add more to this you will need access to the ResourceSpace config.php file where you can add and change defaults.