
Video Scenes (TransNet V2 & optional OpenAI descriptions)
The Video Scenes plugin adds a scene table to a video's resource view. Each row has a thumbnail, timestamp and optional description. Click the timestamp button or thumbnail to play that part of the video.
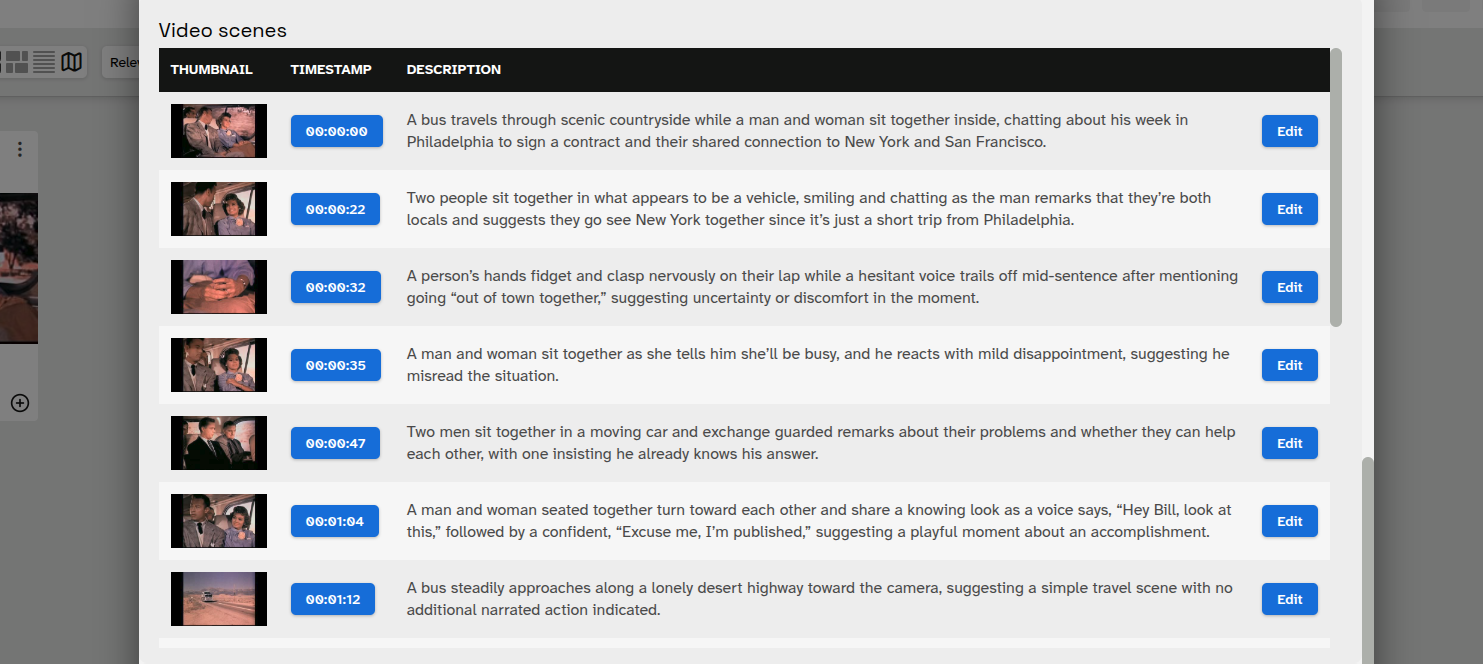
Detection runs locally through the published transnetv2-pytorch Python package. Its wheel includes the model weights. No Git checkout, Git LFS or separate model download is needed. Start with local detection, then enable OpenAI descriptions if required.
System requirements
- Ubuntu with ResourceSpace and the video_scenes plugin.
- Python 3.10 or later with a compatible prebuilt PyTorch package.
- FFmpeg and FFprobe.
- Memory and temporary disk space for video processing.
- ResourceSpace's offline job queue and a scheduled offline worker.
The following installation uses CPU packages. A GPU, CUDA and a compiler are not required.
Installation instructions (Ubuntu)
Run these commands on the server executing ResourceSpace jobs. Replace /var/www/html if ResourceSpace is installed elsewhere. If you already have a suitable isolated Python environment, reuse it and skip creating another one.
1. Install the Ubuntu dependencies and create one Python environment
sudo apt update
sudo apt install -y python3-venv ffmpeg
sudo python3 -m venv /opt/resourcespace-video-scenes/venv
sudo /opt/resourcespace-video-scenes/venv/bin/python -m pip install --upgrade pip
A single environment keeps these dependencies separate from Ubuntu's managed Python packages and other plugins. It is used for both scene detection and optional descriptions.
2. Install the published packages
sudo /opt/resourcespace-video-scenes/venv/bin/python -m pip install torch --index-url https://download.pytorch.org/whl/cpu
sudo /opt/resourcespace-video-scenes/venv/bin/python -m pip install -r /var/www/html/plugins/video_scenes/scripts/requirements.txt
The first command selects a prebuilt CPU wheel. Skip it if the environment already contains a supported PyTorch installation. The requirements file installs transnetv2-pytorch==1.0.5 and websocket-client. The detector package supplies its other Python dependencies and bundled weights.
Use the PyTorch installation selector if your Python version or hardware needs a different supported wheel.
3. Verify the package independently
/opt/resourcespace-video-scenes/venv/bin/python -m transnetv2_pytorch --help
/opt/resourcespace-video-scenes/venv/bin/python -m transnetv2_pytorch /path/to/video.mp4 --output /tmp/scenes.json --format json --threshold 0.5 --quiet
Replace the video path with a short test video and choose an unused output filename; the CLI can overwrite its output. The second command should create a JSON list of detected shots. The direct executable transnetv2_pytorch accepts the same options. The plugin invokes the module with its configured Python.
The package uses its bundled weights automatically. Do not create a separate copy or configure a weights path.
4. Check access for the job account
If ResourceSpace jobs run as www-data, check that account can execute the package:
sudo -u www-data /opt/resourcespace-video-scenes/venv/bin/python -m transnetv2_pytorch --helpRun the video command under the same account as well, selecting a readable input and writable output path. Use your actual service account if different. It needs read and execute access to Python, the package, bundled weights, FFmpeg and FFprobe; read access to original videos; and write access to OS temporary storage and ResourceSpace's job storage.
Plugin configuration
Enable Video scenes under Admin > System > Plugins and open its configuration.
The Python executable is a backend-only setting and is not exposed in the plugin form. If Python is not available as /usr/bin/python3, an administrator must set $video_scene_python in plugins/video_scenes/config/config.php to the absolute interpreter path.
| Setting | Value |
|---|---|
| Scene transition threshold | 0.5; must be greater than 0 and less than 1. |
| OpenAI API key | Leave empty for local detection and thumbnails. |
| OpenAI Realtime model | gpt-realtime-2.1, used only when a key is configured. |
| Include scene audio in descriptions | Yes, used only when a key is configured and audio is present. |
| Audio context before and after each scene | 1 second by default; set from 0 to 30 seconds. Applies to both sides and is clipped at video boundaries. |
| Scene description prompt | A multiline editable prompt, up to 8,000 bytes. It guides the model to combine the frames with audio context. |
| Searchable scene descriptions field (optional) | Select a text field to store all scene descriptions, one per line, for normal ResourceSpace search and indexing. Leave blank to disable. |
| Maximum processing time per video (seconds) | 7200 (two hours); allowed range 60 to 86400. |
Save the settings. Python must point to the environment where you installed the package. The previous inference directory and weights directory settings have been removed.
ResourceSpace creates or upgrades resource_scene through the plugin's database definitions. Existing scene rows are preserved during schema upgrades. No manual SQL is needed.
Background processing
Scene analysis is always queued. In this revision the worker requires the installation configuration setting $offline_job_queue to be enabled. Ask your administrator to check the following:
$ffmpeg_path = '/usr/bin';
$offline_job_queue = true;
Enabling the queue also affects other ResourceSpace operations that support background processing. The plugin adds the configured FFmpeg and FFprobe directories to the detector's PATH.
Reuse the existing offline worker schedule. If none exists, this example in the service account's own crontab runs it every minute with a maximum of one concurrent job:
* * * * * /usr/bin/php /var/www/html/pages/tools/offline_jobs.php --max-jobs=1Use your installation's PHP CLI. Keep worker output in your normal scheduled-task logs. To inspect a manual run:
sudo -u www-data /usr/bin/php /var/www/html/pages/tools/offline_jobs.php --max-jobs=1See Managing offline jobs for the job management interface.
Testing and everyday use
- Leave the OpenAI key empty and upload a short video containing several clear cuts.
- Wait for the worker and check the job status under Admin > System > Manage jobs.
- Reopen the resource view. You should see scene thumbnails and timestamps. Without an API key, the description column displays No description available.
- Click either a timestamp or thumbnail to play the scene.
Recreating a video's previews queues fresh analysis. Existing resources are not scanned automatically. Alternatives and audio-only formats are ignored. The scene table honours resource, video preview and external-share permissions. Thumbnails are omitted for viewers requiring watermarks.
Users with edit access to the resource can click Edit beside a scene description, enter or correct the text, and click Save. Cancel discards unsaved changes. Administrator permission is not required. Descriptions can be added without an OpenAI key or cleared by saving an empty value. Changes are recorded in the resource log. External-share views are read-only.
Recreating previews replaces the scene breakdown and descriptions, including manual edits.
When a searchable descriptions field is selected in plugin setup, the worker writes the current scene descriptions to that resource metadata field after scene processing. Each description is on its own line. ResourceSpace's normal metadata update path indexes the text for search. Select a text field available for the video resource type. Leave the setting blank if you do not want scene descriptions copied to metadata. Each subsequent processing run replaces the field value with the latest descriptions.
A shortened video preview cannot play its later scenes. Provide a full-length preview, or use the installation's permitted original-video playback configuration, to reach every scene.
Expected detection output
The verified CLI supports --output, --format json, --threshold, --quiet and --device. Its JSON records contain these six fields:
[
    {
        "shot_id": 1,
        "start_frame": 0,
        "end_frame": 24,
        "probability": 0.87,
        "start_time": "0.000",
        "end_time": "0.960"
    }
]
Shot IDs start at 1. Frame numbers start at 0 and both frame endpoints are inclusive. Probability is the maximum predicted transition probability within the scene. The CLI's times are rounded to milliseconds; its end time is the start of the last included frame.
ResourceSpace keeps numeric source timestamps and an exclusive end time, so the example above ends at 1.0 seconds for a 25fps source. Shot IDs and probabilities are retained. For variable frame rate videos, a small temporary lossless proxy preserves one frame per original frame for CLI detection, and the plugin maps the resulting indices back to original presentation times. Constant frame rate inputs go directly to the CLI.
Optional OpenAI descriptions
Once detection works, enter an OpenAI API key, save, and recreate the video's previews. The API project needs billing and access to the configured model. Each scene's nine-frame collage and enabled audio are sent in one description request; no separate Whisper installation is needed. Audio includes the configured context interval before and after the scene, clipped at the start and end of the video. The default is one second. This helps interpret words or sounds that cross scene boundaries. Videos without audio use images alone.
The scene description prompt is editable in plugin setup. By default, it asks the model for one concise account of what is happening, guided by both the frames and audio. It asks the model to use speech and meaningful sounds as context and not to comment on absent audio or recording quality. Adjust the prompt to suit your collection.
The model must support image and audio input through the OpenAI Realtime API. Allow outbound TLS WebSockets to api.openai.com on port 443. API usage is chargeable. With no key, detection and thumbnails remain local.
Descriptions are visible to users allowed to see the scene table, independently of metadata field permissions.
Troubleshooting
- Module not found: use the configured Python to run -m pip show transnetv2-pytorch and repeat installation in that environment. Installing into a different interpreter does not help the worker.
- No suitable PyTorch wheel: check the Python version and architecture against the PyTorch installation selector. Use a supported prebuilt package instead of compiling a runtime.
- Bundled weights missing: reinstall the published package in the same environment with
python -m pip install --force-reinstall --no-deps transnetv2-pytorch==1.0.5 - Jobs stay queued: check $offline_job_queue, plugin enablement and the scheduled worker. The job's user must still exist and retain original-file access or edit permission.
- Detector failure: worker output includes the CLI exit status and a bounded diagnostic. Run the independent CLI command under the job account to investigate. Check ffmpeg -version, ffprobe -version, file permissions, temporary space, memory and the job timeout.
- Descriptions missing: check the key, model access, billing and WebSocket connectivity. Audio is limited to ten minutes per scene; disable it to describe longer scenes using images. Description failures keep scene boundaries and thumbnails but mark the job as failed. Recreate previews to retry.
Processing uses a private temporary workspace for CLI output, any proxy, thumbnails and collages. It is removed after processing. Local processing failures retain previously saved scene rows.