Installing and upgrading
- Installation overview
- General installation requirements
- Installing on Ubuntu Linux
- Installing on Windows Server
- Installing on macOS
- Installing on CentOS Linux
- Installing via Docker
- Installing on SuSE
- Configuring php.ini
- Configuring Apache
- Configuring the database
- Upgrading
- LibreOffice integration for Microsoft Office previews
- OpenCV (facial recognition) - deprecated
- Upgrading PHP versions
- Setting up scheduled tasks/cron
Backups
Security
User management
Advanced user group options
Customising ResourceSpace
Plugins
StaticSync
Configuring ResourceSpace
- The config file
- Offline job queues
- File integrity checking
- ResourceSpace file storage (filestore)
- Checksums
- Edit access for contributors
- Configuring Leaflet Maps
- Automatic alternative video files
- Signing all database PHP code
- Integrating with Uppy Companion
- The System Configuration page
- Configuring image alternatives
- Minimal preview creation
- Mounting Amazon S3 for external storage
Integrations
Creating and editing filters
Creating and editing filters
To manage your filters, navigate to Admin > System > Filters. From here, you can choose to either create a new filter or to edit an existing one.
On the 'Edit filter' page, you can rename your filter, configure the filter criteria and add/remove rules.
| Filter name | Here you can enter a user friendly name of your filter. Migrated filters will have the text of the original filter but can safely be renamed |
| Criteria | Choose whether ALL, ANY or NONE of the rules must apply for the filter to allow access |
| Filter rules | This shows all rules set for the filter. Rules can be deleted by clicking on the 'x' to the right of the filter |
| Add filter | Click here to add a new rule to the filter |
| Delete | Check this box and then click the Save button to delete the filter. If the filter is currently in use, deletion will be prevented and a notice will appear indicating which groups/users are using the filter |

To set up filters, you also need to decide which metadata field option it will be linked to. This option can then be added as a filter rule, which works to activate the filter in the system.
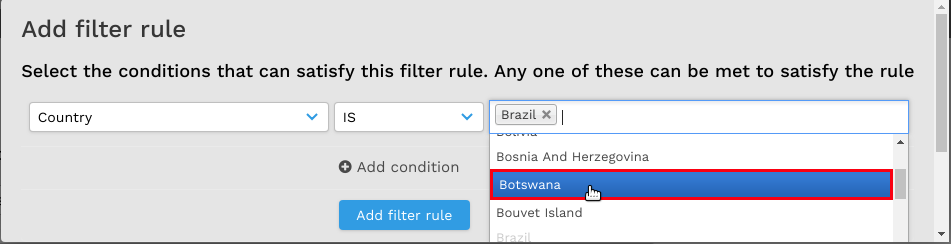
Adding filter rules
To add a filter rule, follow these steps:-
- Select the field you wish the rule to check. The dropdown box 'Select some options' will then be populated with the relevant field options
- Select whether the resources must have one of the chosen options set ('IS') or must not have any of the options set ('IS NOT')
- Select the desired field options. For large lists you can narrow down the list by starting to type the name of the option
- To add more rule conditions, click on the plus sign labelled 'Add condition'
- Once you have finished click the 'Add filter rule' button